You are viewing an old version of this page. View the current version.
Compare with Current
View Page History
Version 1
Next »
This page introduce how to create Job, copy Job, add attachment to job and how to update the Project Code to job after the project is created.
1. Create Job by copy from existing record (for example, copy from the Job card it created for template)
Step 1 - Click [Jobs] in navigation bar. |
|---|
Note: if the link not included in navigation bar, click Search button then enter jobs into search box.. 
|
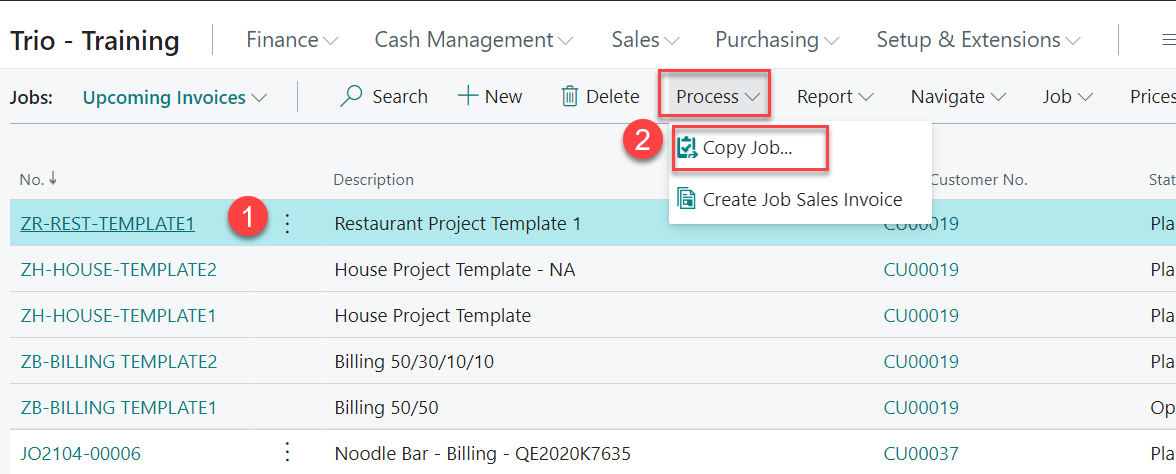
Step 2 - Create new Job by copy from template. |
|---|
Select Template then choose action Process => Copy Job 
|
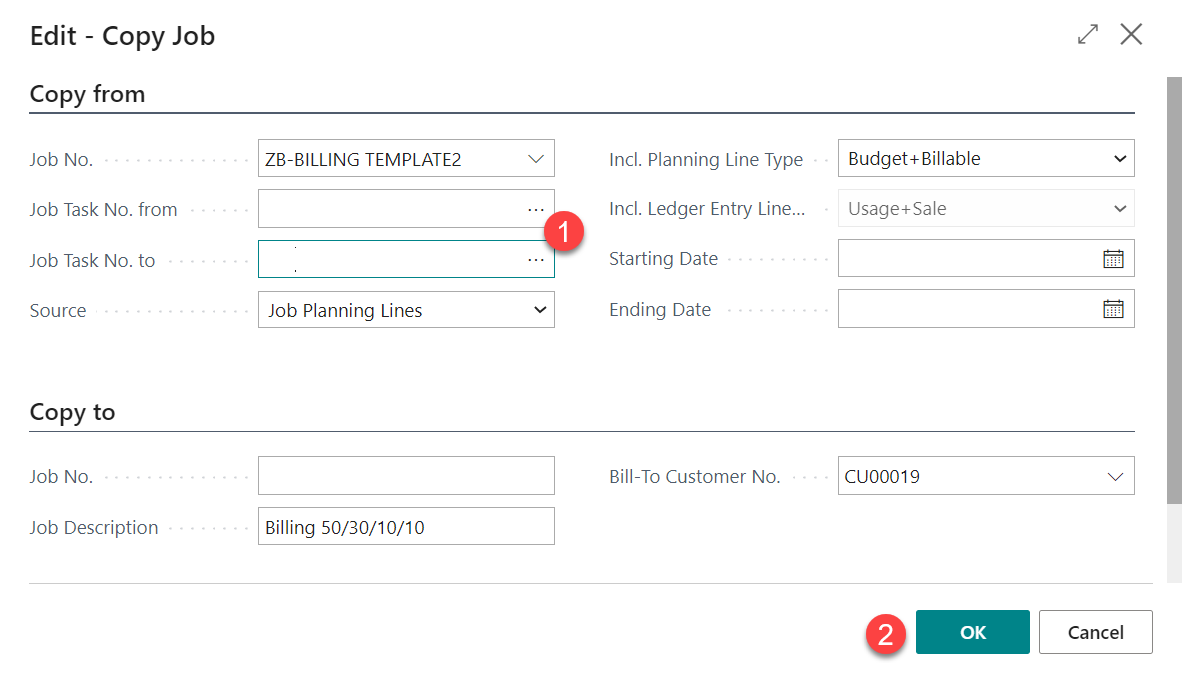
Select Job Tasks No. it needs to copy from the template, then click OK 
|
|
Step 3 – Enter Job information. |
|---|
Change the data it copied from Template. The key information for Job Card as mentioned in the table below:: Fields | Details | No. | Auto Generate by system | Description | Enter the Job Description | Bill-to Customer No | Select from Customer List. | Bill-to Contact No | Default from customer, user can select another contact for the customer if needs | Project In-Charge | Select from Resource List. | Project-in Charge Phone | Default from selected Project-In-Charge | Person Responsible | Select from Resource. Responsible Person = Site Forman in project schedule excel | Person Responsible Phone | Default from selected Person Responsible To be show in project schedule excel mobile for site foreman | | Project Code | If Quote confirmed and the project code is created |
|
2. Create Job without copy data from existing record
1 - Select action New to create new job card |
|---|
|
2 - Enter Project Information |
|---|
Key information for job as below: No. | Auto Generate by system |
|---|
Description | Enter the Job Description | Bill-to Customer No | Select from Customer List. | Bill-to Contact No | Default from customer, user can select another contact for the customer if needs | Project In-Charge | Select from Resource List. To be show in project schedule excel | Project-in Charge Phone | Default from selected Project-In-Charge To be show in project schedule excel | Person Responsible | Select from Resource. Responsible Person = Site Forman in project schedule excel | Person Responsible Phone | Default from selected Person Responsible To be show in project schedule excel mobile for site foreman | | Project Code | If Quote confirmed and the project code is created |
|
3 - Enter Job Tasks information |
|---|
Key information for Job Task as below Field Name | Remarks |
|---|
Job Tasks No | For Project Schedule Job Tasks No. = column [Item] in project schedule excel For sorting and sub task’s purpose, suggest use 4 digit and beginning with 0100. For Billing Schedule Job Tasks No. = "payment for installment" show in sales invoice printout e.g. DEPOSIT, 1ST PAYMENT etc | Description | Enter the Tasks Description | Job Tasks Type | For Project Schedule Select Heading if the tasks have sub-tasks For Billing schedule may not have sub-tasks, remain the default Job Task Type "Posting |
|
| 4 - Enter Job Planning Lines |
|---|
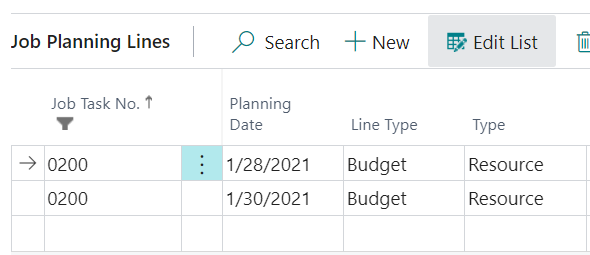
1) Select Job Tasks 2) Select Line => Job => Job Planning Lines 
|
For Project Schedule Enter the plan start date for the tasks in 1st line then enter the plan end date in end line. For example, Task 0200 Duration from 1/28/2021 to 1/30/2021 *add line for start date and end date and enter the planning date only. No need to edit other fields. 
For Billing Schedule Enter 1 job planning lines for each installment (i.e. Job Tasks) Fill up the key fields below: | Field | Description |
|---|
| Planning Date | The planned billing date | | Line Type | Billable | | Type | Item | | No | Select from Item Card - the item created for the payment description | | Quantity | 1 | | Unit Price | Enter the planned billing amount | | Line Amount | Calculated by system |

|
Tips: manage job planning line for all tasks
| 1 | Click on the Start Date |
|---|
| |
| 2 | Clear the filter for Job Task No, |
| |
| 3 | Click Edit List to edit the Job Planning line for Tasks |
| |
3. Add attachment to jobs
| 1 | Select Job from Navigation bar then select appropriate action button |
|---|
| Open the job card, then select Process, Attachment 
|
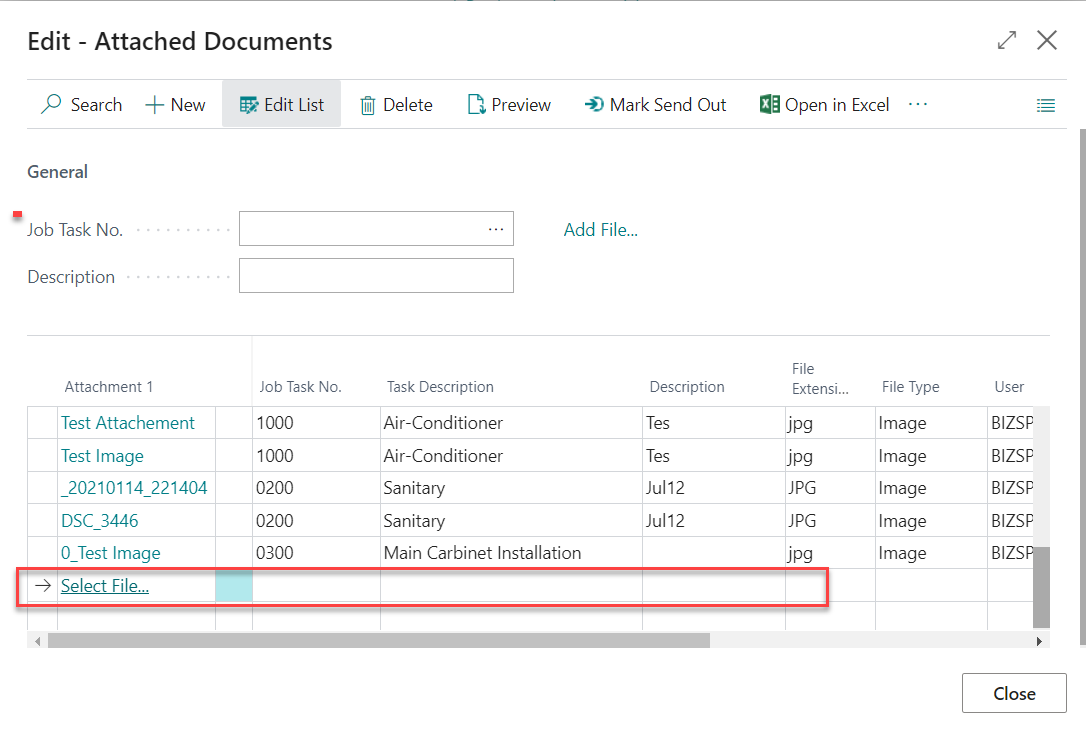
| Attachments page to be shows. Follow the steps below to add an attachment. - Click on the new line. link "Select File..."to be show
- Click the link “Select File…” to select file from your disk.
- (Optional) Enter the Job tasks No. for identify the attachment is related to which tasks.
- Task Description – System shows the tasks description for reference.
- (Optional) Enter the Description for the attachment
- (Optional) Select Type from a list e.g. From Customer, Send Out etc.
- File Extension and File Type to be auto detected and fill up by system.
- User to be auto populated by system according to the login user.

|
| Attachments button also available in Tasks Tab Actions => Line and Attachments 
|
| 2 | Mark Send Date for the attachment |
|---|
| To mark the Send Out Date, either select Actions, Mark Send Out or pick date from Calendar 
|
4. Update Dimension to Job
Step 1 - Select Job from Job list then select action Job => Dimensions-single |
|---|
Update Dimension (i.e. Project Code) to Job without open the Job Card 
|
Step 2 - Select [Project] for Dimension Code then select the project no. in Dimension value code. |
|---|
1) Select Dimension Code (i.e. Project) 2) Select Dimension Value Code 3) Value Posting - select Same Code 
|


